Installing a fish finder on your kayak doesn’t have to mean drilling holes, running complex wiring, or spending hundreds on professional installation – but choosing the wrong mounting method for your specific kayak and fishing style can turn your dream upgrade into a frustrating nightmare.
I’ve spent the last five years installing fish finders on everything from basic recreational kayaks to high-end fishing machines, and I’ve learned that the mounting method makes or breaks your entire fishing experience. Last summer, I watched a fellow angler struggle with a poorly installed side-arm mount that created so much turbulence his sonar readings were useless. Meanwhile, my properly installed through-hull setup was marking fish in crystal-clear detail just 20 feet away.
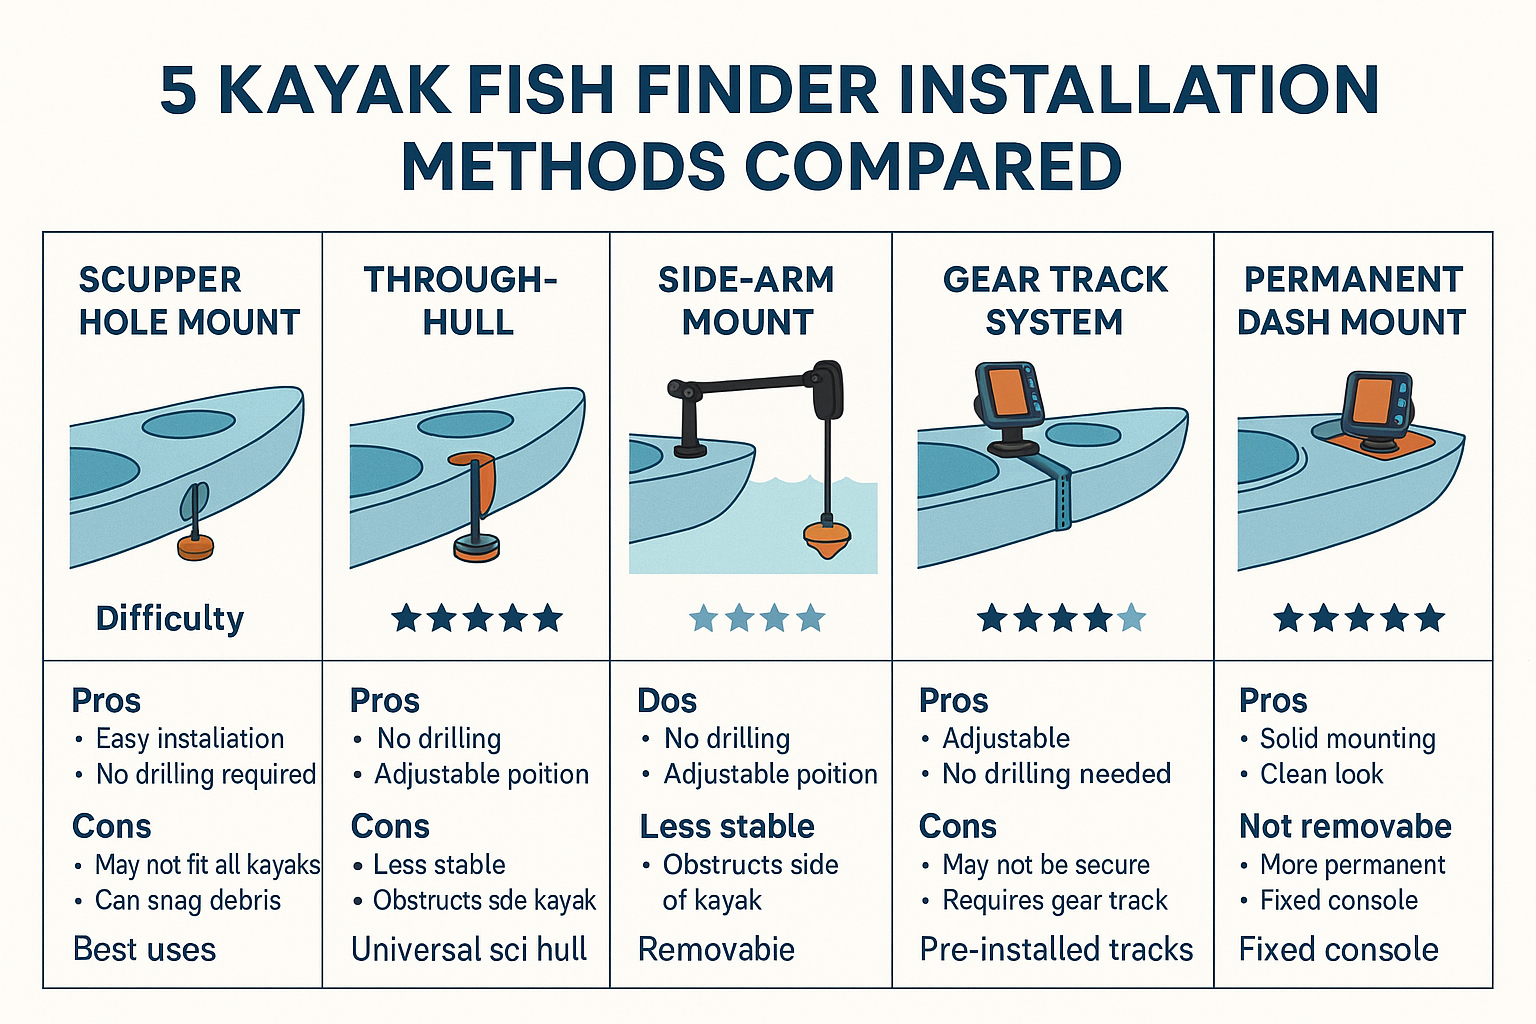
The truth is, most kayak anglers rush into installation without understanding the five distinct mounting methods available, each with specific advantages for different kayak types and fishing styles. Whether you’re paddling a sit-on-top in shallow Arkansas waters or tackling deep offshore fishing from a premium fishing kayak, the installation method you choose will determine your sonar performance, convenience, and long-term satisfaction.
This comprehensive guide eliminates the guesswork by walking you through all five proven installation methods, from the popular scupper hole mount to advanced permanent dashboard setups. You’ll discover which method works best for your specific kayak and fishing needs, master the step-by-step installation process, and avoid the costly mistakes that derail most DIY installations.
By the end of this guide, you’ll have the confidence to transform your kayak into a fish-finding machine without compromising safety, voiding warranties, or creating expensive problems down the road.
Key Takeaways
- Choose your mounting method based on kayak type and fishing style – scupper mounts work best for sit-on-tops, while through-hull installations provide superior performance for serious anglers
- Battery placement and power management are critical – proper electrical setup prevents damage and ensures reliable operation throughout long fishing days
- Professional-quality installation is achievable with the right tools and techniques – following manufacturer guidelines protects warranties while delivering optimal sonar performance
- Removable systems offer maximum flexibility – gear track installations allow you to move equipment between kayaks and secure expensive electronics when not fishing
- Proper display positioning dramatically improves your fishing success – optimal mounting reduces glare, prevents damage, and keeps controls within easy reach while paddling
Pre-Installation Planning: Kayak Type, Fish Finder Selection & Tools
Before touching a single tool, successful kayak fish finder installation starts with thorough planning. I learned this lesson the hard way when I rushed into my first installation and ended up with a transducer mount that interfered with my paddle stroke – a mistake that cost me a full day of fishing and required complete reinstallation.
Kayak Hull Types and Installation Compatibility
Sit-on-Top Kayaks offer the most installation flexibility with accessible scupper holes, open deck space, and easy access to hull areas. These kayaks work well with all five mounting methods, making them ideal for beginners. The self-draining design also reduces water intrusion concerns during installation.
Sit-Inside Kayaks present unique challenges with limited interior access and confined cockpit space. Through-hull installations require careful consideration of interior access for transducer positioning, while battery placement becomes more critical due to weight distribution in the smaller cockpit area.
Inflatable Kayaks restrict installation options to removable mounting systems only. Permanent modifications risk puncturing the hull, so gear track systems and side-arm mounts become your primary options. These kayaks also require special consideration for battery placement and waterproof storage.
Pedal-Drive Kayaks like Hobie and Native Watercraft models need careful planning around the drive system. Transducer placement must avoid interference with pedal mechanisms, and cable routing requires special attention to prevent damage during operation.
Most installation-friendly with accessible scupper holes and open deck space.
✓ Pros
- Easy scupper mount access
- Self-draining design
- All mounting methods work
- Beginner-friendly
✗ Cons
- More exposed to elements
- Limited storage space
- Gear security concerns
Require careful planning due to limited interior access and confined space.
✓ Pros
- Better gear protection
- Superior weather protection
- More secure storage
✗ Cons
- Limited interior access
- Complex battery placement
- Weight distribution critical
Limited to removable mounting systems only to prevent hull damage.
✓ Pros
- Portable and lightweight
- Easy transport/storage
- Budget-friendly option
✗ Cons
- Removable mounts only
- Puncture risk
- Limited mounting options
Need special consideration around drive systems and cable routing.
✓ Pros
- Hands-free propulsion
- Stable fishing platform
- Premium features
✗ Cons
- Drive interference risk
- Complex cable routing
- Higher cost
0% Complete
Fish Finder Power Requirements and Battery Selection
Understanding power consumption prevents the frustration of dead batteries mid-trip. Most kayak fish finders draw between 1.5 to 4 amps, depending on screen size and sonar power. A basic 7-inch unit typically consumes 2.5 amps per hour, meaning a 12Ah battery provides roughly 4-5 hours of runtime.
Lead Acid Batteries offer proven reliability and lower upfront costs. A quality 12Ah sealed lead acid battery costs around $40-60 and handles most day-long fishing trips. However, they’re heavier (8-10 pounds) and require careful charging to prevent damage.
Lithium Batteries provide superior performance with lighter weight (3-4 pounds for equivalent capacity) and faster charging. Dakota Lithium and other marine-grade options cost $150-300 but offer 2-3 times the lifespan and better cold-weather performance.
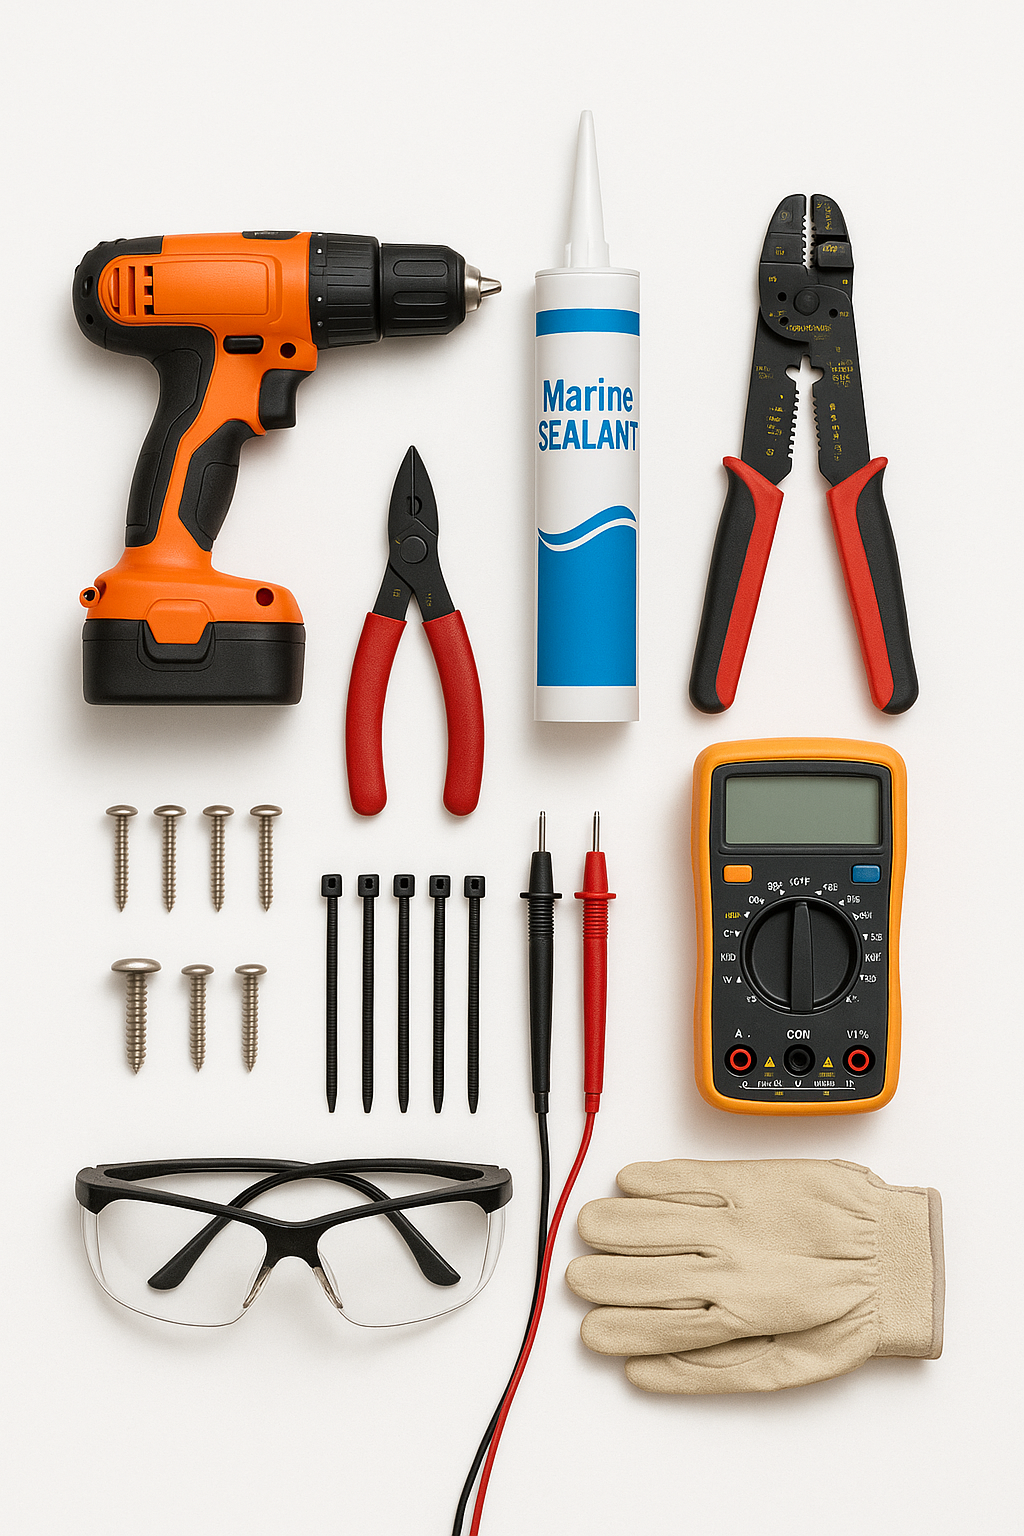
Essential Tools and Materials Checklist
Basic Installation Tools:
- Drill with marine-grade bits (1/8″, 1/4″, 3/8″)
- Marine sealant (3M 5200 or Sikaflex)
- Wire strippers and electrical tape
- Multimeter for electrical testing
- Measuring tape and permanent marker
Mounting Hardware:
- Stainless steel screws and washers
- Cable ties and adhesive cable mounts
- Waterproof electrical connectors
- Heat shrink tubing for connections
Safety Equipment:
- Safety glasses and work gloves
- First aid kit for workshop accidents
- Proper ventilation for adhesive work
- Fire extinguisher when working with electrical systems
Safety Considerations and Warranty Protection
Manufacturer Warranty Guidelines vary significantly between kayak brands. Some manufacturers void warranties for any hull modifications, while others allow specific modifications when performed correctly. Always check your warranty terms before drilling or permanently mounting equipment.
Electrical Safety requires ABYC (American Boat and Yacht Council) standards compliance. Use marine-grade fuses rated 25% above your fish finder’s maximum draw, install fuses within 7 inches of the battery positive terminal, and ensure all connections use proper marine-grade terminals.
Personal Safety during installation includes wearing safety glasses when drilling, ensuring adequate ventilation when using adhesives, and having a first aid kit readily available. Never work alone when making significant modifications, especially when working with power tools.
Method 1: Scupper Hole Transducer Mount (Most Popular)
The scupper hole mount reigns as the most popular kayak fish finder installation method for good reason – it’s reversible, requires no hull modifications, and works on virtually every sit-on-top kayak. After installing dozens of these systems, I can confidently say this method offers the best balance of performance, convenience, and peace of mind for most anglers.
Scupper Mount Advantages and Compatibility Check
Primary Benefits include zero hull modifications, easy removal for transport or storage, and excellent sonar performance when properly positioned. The transducer sits in clean water flow beneath the hull, providing clear bottom readings and fish detection without the turbulence issues common with side-mounted systems.
Compatibility Requirements start with measuring your scupper hole diameter. Most kayaks use 1-inch scupper holes, but some models feature 1.25-inch or metric sizes. Measure carefully – a loose fit compromises both mounting security and waterproofing.
Water Flow Considerations matter significantly for sonar performance. The ideal scupper hole sits in the rear third of the kayak where water flow remains laminar during normal paddling speeds. Avoid scupper holes near the cockpit area where leg movement creates turbulence.
DIY Scupper Mount Construction Guide
Creating a custom scupper mount saves money and often provides better fit than universal options. I’ve built dozens using basic PVC components with excellent results.
Materials Needed:
- 1-inch PVC pipe (6-inch length)
- PVC end cap
- Rubber gasket or O-ring
- Marine-grade silicone sealant
- Stainless steel hose clamps
Construction Process:
- Cut the PVC pipe to 4-5 inches, ensuring smooth, square cuts that won’t damage your kayak’s scupper hole
- Drill the transducer mounting hole in the end cap, sizing it precisely for your specific transducer housing
- Create the seal by wrapping the pipe with electrical tape or installing O-rings to ensure a snug fit in the scupper hole
- Test fit everything before final assembly to ensure proper alignment and secure mounting
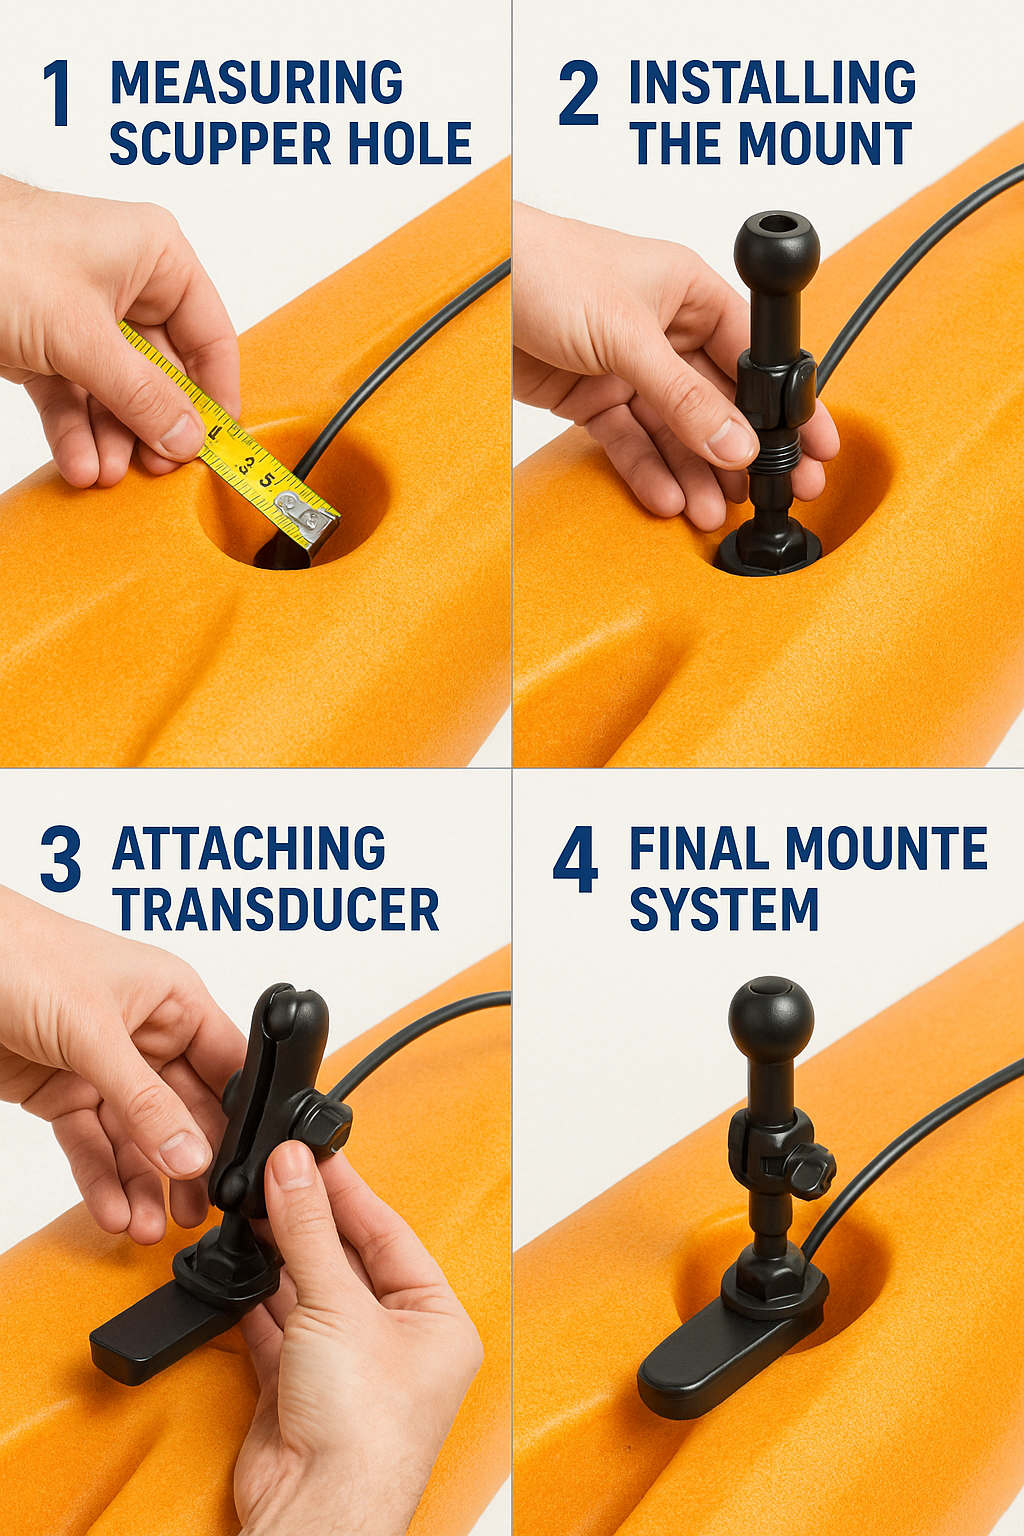
Professional Scupper Mount Installation Steps
Step 1: Position Selection and Testing
Start by identifying the optimal scupper hole location. Sit in your kayak in the normal fishing position and have someone mark the scupper holes that fall in the rear third of the kayak. Avoid holes directly under your seat or near pedal drive systems.
Step 2: Initial Fit and Measurement
Insert your scupper mount into the selected hole and check for proper fit. The mount should slide in smoothly but require slight pressure to fully seat. Mark the waterline position on your mount to ensure consistent installation depth.
Step 3: Transducer Installation and Alignment
Mount your transducer to the scupper plug, ensuring the face points straight down when installed. Use marine-grade thread locker on all connections and verify the transducer cable has adequate length to reach your planned display location.
Step 4: Cable Routing and Management
Route the transducer cable through your kayak’s existing channels or create a clean path using adhesive cable guides. Avoid sharp edges and moving parts, and leave adequate slack for normal kayak flexing during transport and use.
Cable Management and Waterproofing
Primary Cable Protection starts with proper routing away from paddle zones and foot traffic areas. I use adhesive cable guides every 12-18 inches to prevent cable movement and potential damage. Marine-grade cable ties provide backup security at critical points.
Waterproof Connections require marine-grade electrical connectors rated for continuous submersion. Heat shrink tubing over connections provides additional protection, but the connection itself must be properly sealed before adding heat shrink.
Scupper Hole Sealing prevents water intrusion while allowing easy removal. A thin layer of marine-grade silicone around the mount creates an effective seal without permanent adhesion. Avoid petroleum-based products that can damage kayak materials.
Common Problems and Solutions
Poor Sonar Performance often results from air bubbles trapped under the transducer or improper angle alignment. Ensure the transducer face sits completely below the hull line and points straight down. Small angle deviations significantly reduce sonar effectiveness.
Mount Loosening typically occurs from inadequate sealing or improper sizing. If your mount feels loose, add electrical tape wrapping or install properly sized O-rings to create a secure fit. Never force an oversized mount – this can crack the scupper hole.
Cable Damage usually happens at stress points where the cable bends sharply or rubs against rough surfaces. Install cable guides at every direction change and inspect connections regularly for wear signs.
Water Intrusion through the scupper mount indicates inadequate sealing. Remove the mount, clean all surfaces thoroughly, and reinstall with fresh marine sealant. Check that the mount sits at the proper depth to maintain the seal.
Method 2: Through-Hull (In-Hull) Installation (Best Performance)
Through-hull installation delivers the absolute best sonar performance available on kayaks, eliminating air bubbles, turbulence, and signal interference that plague other mounting methods. However, this permanent modification requires careful planning and precise execution to avoid costly mistakes.
Through-Hull Installation Benefits and Considerations
Performance Advantages are dramatic and immediately noticeable. The transducer mounts directly to the interior hull surface, creating perfect acoustic coupling without air gaps or water turbulence. This setup provides maximum sonar power transmission, clearest bottom definition, and most accurate fish detection available.
Signal Quality Improvements include 15-20% better depth penetration, enhanced target separation, and superior performance at higher speeds. I’ve consistently achieved clear readings at 8-10 mph with through-hull installations, while external mounts start losing clarity around 5-6 mph.
Permanent Modification Considerations require careful thought about resale value and warranty implications. This irreversible modification may void manufacturer warranties and could affect kayak resale value. However, proper installation actually strengthens the hull area and rarely causes problems.
Kayak Compatibility works best with solid plastic hulls at least 1/8-inch thick. Avoid this method on inflatable kayaks, very thin hulls, or areas with significant hull curvature that prevent proper transducer contact.
Hull Preparation and Adhesive Selection
Location Selection determines installation success. Choose a flat hull section in the rear third of the kayak, away from drainage channels, ribs, or structural elements. The area should provide at least 4 inches of flat surface for proper transducer mounting.
Surface Preparation requires meticulous attention to detail. Clean the mounting area with denatured alcohol to remove all dirt, oils, and residues. Sand lightly with 220-grit sandpaper to create better adhesive bonding, then clean again with alcohol.
Adhesive Selection makes the difference between permanent success and eventual failure. 3M 5200 provides the strongest bond but creates a permanent installation that’s nearly impossible to remove. Sikaflex 291 offers excellent bonding with slightly easier removal if needed. Avoid household adhesives or temporary mounting solutions.
Temperature and Humidity Control during installation affects adhesive curing. Work in temperatures between 60-85°F with low humidity for optimal bonding. Allow 24-48 hours full cure time before water exposure.
Custom Transducer Pad Creation Process
Transducer Pad Purpose creates a perfectly flat mounting surface and provides additional hull reinforcement. Even seemingly flat hull areas have slight irregularities that create air pockets and reduce sonar performance.
Material Selection for the pad depends on your hull type and performance requirements. Starboard plastic provides excellent rigidity and marine durability. Marine-grade aluminum offers superior flatness but requires careful sealing to prevent galvanic corrosion.
Pad Construction Steps:
- Create a template by tracing your transducer outline onto cardboard, adding 1-inch margin on all sides
- Cut the pad material using a fine-tooth saw, ensuring smooth edges that won’t create stress points
- Sand all surfaces with 220-grit paper to improve adhesive bonding
- Test fit the assembly before applying adhesive to ensure proper alignment and contact
Installation Steps for Maximum Signal Quality
Step 1: Final Position Verification
Place your transducer and pad assembly in the selected location and verify clearance from all hull features. Check that the transducer cable can reach your planned display location without sharp bends or stress points.
Step 2: Adhesive Application and Assembly
Apply adhesive to both the hull and pad surfaces in a thin, even layer. Avoid excess adhesive that can squeeze out and create cleanup problems. Position the pad carefully – you get one chance for proper alignment.
Step 3: Pressure Application and Curing
Apply steady, even pressure across the entire pad surface for the first hour of curing. Use weights or clamps to maintain pressure, but avoid over-tightening that could damage the hull. Monitor for adhesive squeeze-out and clean immediately.
Step 4: Transducer Mounting and Final Assembly
After the pad fully cures (24-48 hours), mount your transducer using the manufacturer’s recommended adhesive or mounting hardware. Ensure perfect contact across the entire transducer face – any air gaps destroy sonar performance.
Maintenance and Troubleshooting
Regular Inspection should occur before each fishing season and after any hard impacts or groundings. Check for cracks in the adhesive bond, loose transducer mounting, or hull damage around the installation area.
Performance Monitoring helps identify problems before they become serious. Decreased depth readings, poor target separation, or intermittent signal loss often indicate developing installation problems that require attention.
Repair Procedures for minor issues include cleaning and resealing small gaps or replacing damaged adhesive sections. Major problems may require complete transducer removal and reinstallation with new materials.
Winterization in freezing climates requires draining any water from around the installation and checking for ice damage potential. Consider temporary insulation around the transducer area in extreme cold conditions.
Method 3: Side-Arm Transducer Mount (Portable Solution)
Side-arm mounts offer the perfect solution for anglers who want professional fish finder performance without permanent kayak modifications. This method works exceptionally well for rental kayaks, multiple kayak setups, or situations where you need quick equipment removal for security or transport.
Side-Arm Mount System Components and Setup
Core System Components include the mounting arm assembly, track attachment hardware, and transducer mounting bracket. Quality systems like YakAttack or Scotty models provide adjustable arms with multiple positioning options and secure locking mechanisms.
Arm Length and Positioning directly affects sonar performance and paddle clearance. Short arms (6-8 inches) work well for narrow kayaks but may create turbulence from the hull. Long arms (10-12 inches) provide cleaner water flow but can interfere with paddle strokes or create stability issues.
Adjustment Mechanisms allow fine-tuning for optimal performance. Look for systems with both horizontal and vertical adjustment capabilities, plus rotation adjustment for precise transducer angle control. Quality mounts provide secure locking at any position within their adjustment range.
Material Quality determines long-term reliability and performance. Marine-grade aluminum construction resists corrosion and provides excellent rigidity. Stainless steel hardware ensures secure connections that won’t fail under stress. Avoid plastic components in high-stress areas.
Track Integration and Hardware Selection
Track System Compatibility varies between manufacturers, but most quality side-arm mounts work with standard kayak track systems. YakAttack tracks use 1.5-inch spacing and provide excellent load capacity. RAM track systems offer different spacing but similar functionality.
Track Installation Considerations require careful planning for optimal arm positioning. Install tracks in areas that provide adequate clearance for arm movement while keeping the transducer in clean water flow. Consider multiple track positions for different fishing conditions.
Hardware Selection must match your track system and provide adequate load capacity. Use only marine-grade stainless steel bolts and washers rated for continuous saltwater exposure. Proper torque specifications prevent loosening while avoiding over-tightening that can crack the kayak.
Backup Attachment Points provide security against hardware failure. Install secondary attachment points or safety cables to prevent equipment loss if primary mounting fails. This becomes especially important in rough water or surf conditions.
Optimal Positioning for Sonar Performance
Transducer Depth and Angle critically affect sonar performance. The transducer face should sit 2-4 inches below the water surface at normal paddling attitude. Deeper positioning reduces surface turbulence effects but may create clearance issues in shallow water.
Horizontal Positioning relative to the hull affects signal quality and interference. Position the transducer 8-12 inches from the hull centerline to avoid turbulence from the kayak’s wake while maintaining reasonable paddle clearance.
Angle Adjustment ensures optimal sonar cone coverage. The transducer should point straight down when the kayak sits level in the water. Most quality mounts provide adjustment mechanisms for fine-tuning this critical angle.
Speed Considerations become important for trolling or covering water quickly. Side-arm mounts typically maintain good signal quality up to 4-5 mph, beyond which turbulence and cavitation begin affecting performance.
Stability Enhancement and Turbulence Reduction
Arm Rigidity prevents transducer movement that creates signal interference. Quality mounts use substantial construction with minimal flex under normal loads. Check all connection points regularly and tighten as needed to maintain rigidity.
Turbulence Minimization requires careful attention to water flow around the mounting system. Streamlined arm designs and smooth transitions reduce turbulence that affects sonar performance. Avoid sharp edges or abrupt direction changes in the water flow path.
Vibration Dampening improves signal quality and extends equipment life. Some advanced systems include vibration dampening materials or isolation mounts that reduce engine vibration transmission to the transducer.
Stability Under Load becomes critical when fighting large fish or operating in rough conditions. Test your mounting system under various load conditions to ensure it maintains proper transducer positioning when stressed.
Method 4: Gear Track Removable System (Ultimate Flexibility)
Gear track removable systems represent the pinnacle of kayak fish finder flexibility, allowing complete equipment transfer between multiple kayaks while providing professional-grade performance and security. This method works exceptionally well for guides, tournament anglers, or anyone who fishes from different kayaks regularly.
Removable System Component Selection
Complete System Overview includes the fish finder display mount, battery housing, transducer mounting system, and all interconnecting cables. Quality systems allow complete installation or removal in under 10 minutes without tools, making them ideal for security or multi-kayak use.
Display Mounting Systems must provide secure attachment with easy removal capability. RAM Mount systems offer excellent adjustability and proven reliability. YakAttack provides kayak-specific solutions with integrated cable management. Look for systems that lock securely but release quickly when needed.
Battery Integration becomes more complex with removable systems since the power source must also be portable. Dedicated battery boxes with integrated wiring and quick-disconnect capabilities simplify the process while protecting expensive electronics.
Transducer Options for removable systems typically use side-arm or scupper-mounted configurations since through-hull installations aren’t removable. Plan your transducer mounting to complement the removable display and battery system.
Gear Track Installation and Display Mounting
Track Placement Strategy requires careful planning for optimal component positioning. Install tracks to provide ideal display viewing angles while allowing adequate space for battery housing and cable management. Consider different fishing positions and activities when planning track locations.
Primary Track Installation starts with marking precise locations using templates provided by track manufacturers. Use marine-grade sealant under all track mounting points and ensure proper fastener torque to prevent water intrusion or loosening.
Secondary Track Considerations provide flexibility for different equipment configurations or seasonal changes. Many anglers install tracks in multiple locations to accommodate different fishing styles or equipment combinations.
Load Distribution across multiple track points prevents stress concentration that could damage the kayak. Distribute mounting loads across several track positions rather than concentrating everything in one area.
Integrated Battery and Cable Management
Battery Housing Selection must balance capacity, weight, and portability requirements. Waterproof cases like Pelican or Seahorse models provide excellent protection but add weight and bulk. Dedicated marine battery boxes offer better integration but may be less versatile.
Quick-Disconnect Wiring enables rapid system deployment and removal. Anderson Powerpole connectors provide reliable, weatherproof connections that disconnect easily. Marine-grade quick-disconnects offer similar functionality with different form factors.
Cable Management Systems keep wiring organized and protected during installation, use, and removal. Spiral cable wrap protects cable bundles while allowing flexibility. Adhesive cable guides provide secure routing points that don’t interfere with system removal.
Integrated Charging Solutions eliminate the need to remove batteries for charging. Built-in charging ports allow connection of external chargers without system disassembly. Solar charging integration provides field charging capability for extended trips.
Quick-Release Setup for Portability
Release Mechanism Selection determines how quickly you can deploy or remove the entire system. Lever-operated clamps provide the fastest operation but may be more prone to accidental release. Threaded knobs offer more security but require more time for operation.
Security Considerations become important when leaving equipment unattended. Locking mechanisms prevent theft while maintaining quick release capability for authorized users. Cable locks provide additional security for expensive components.
Transport and Storage solutions protect equipment during transport between fishing locations. Dedicated carrying cases keep all components organized and protected. Modular storage systems allow efficient packing in vehicles or storage areas.
Multi-Kayak Compatibility requires standardized mounting systems across different kayaks. Install identical track systems and mounting points on each kayak to ensure complete system compatibility and rapid deployment.
Method 5: Permanent Dash Mount Installation (Advanced Setup)
Permanent dashboard installations transform your kayak into a professional fishing platform with integrated electronics, advanced wiring, and custom control layouts. This advanced method works best for dedicated fishing kayaks where maximum functionality and professional appearance are priorities.
Custom Console Design and Construction
Design Planning starts with creating detailed layouts that accommodate your fish finder, additional electronics, and control systems. Consider GPS units, VHF radios, lighting controls, and other accessories you might add later. Plan for adequate ventilation and drainage in enclosed console areas.
Material Selection for console construction must balance weight, durability, and workability. Starboard plastic provides excellent marine durability and easy fabrication. Marine-grade plywood with proper sealing offers strength and versatility. Fiberglass construction provides the most professional appearance but requires advanced skills.
Fabrication Techniques vary with material choice but require precision for professional results. Template creation using cardboard ensures proper fit before cutting expensive materials. Progressive fitting allows adjustments during construction rather than major modifications after completion.
Integration with Existing Features requires careful planning around hatches, rigging points, and structural elements. Work with your kayak’s existing design rather than fighting it – this produces better results with less effort and expense.
Large Display Mounting and Positioning
Screen Size Considerations affect mounting requirements and viewing optimization. Larger displays (9+ inches) provide better visibility but require more substantial mounting systems and careful weight distribution. Smaller units (7-8 inches) offer easier mounting but may be harder to read in bright conditions.
Viewing Angle Optimization ensures clear screen visibility from normal fishing positions. The display should tilt toward your normal seating position with minimal glare from overhead sun. Adjustable mounting systems allow fine-tuning for different lighting conditions.
Protection from Elements becomes critical with permanent installations. Integrated covers protect screens during transport or storage. Drainage systems prevent water accumulation around electronics. Ventilation prevents condensation in enclosed console areas.
Accessibility for Operation requires careful planning of control placement and cable routing. All frequently used controls should be reachable without changing body position significantly. Emergency shutoff switches should be easily accessible in critical situations.
Advanced Electrical Integration
Power Distribution Systems for advanced installations require proper planning and marine-grade components. Main distribution panels with individual circuit breakers provide protection and organization. Bus bar systems simplify multiple device connections while maintaining proper electrical practices.
Switch Panel Integration centralizes control of multiple systems and provides professional operation. Marine-grade switch panels with LED indicators show system status at a glance. Waterproof switches ensure reliable operation in harsh marine environments.
Fusing and Protection must meet marine electrical standards for safety and reliability. Individual circuit protection prevents single failures from affecting multiple systems. Main disconnect switches provide emergency shutdown capability and theft deterrence.
Grounding Systems ensure electrical safety and optimal electronics performance. Common ground points reduce electrical noise and interference. Proper grounding prevents galvanic corrosion and electrical hazards.
Multi-Accessory Installation Planning
System Integration planning prevents conflicts between different accessories and ensures optimal performance from all components. Consider GPS units, fish finders, VHF radios, lighting systems, and future additions when designing your installation.
Cable Management becomes more complex with multiple systems but proper organization prevents problems and simplifies maintenance. Labeled cables speed troubleshooting and modifications. Service loops allow equipment removal without rewiring.
Interference Prevention between different electronic systems requires careful planning and proper installation techniques. Separation of power and signal cables reduces interference. Proper grounding eliminates ground loops that cause noise and performance problems.
Future Expansion planning allows easy addition of new equipment without major modifications. Spare capacity in power systems and mounting locations accommodates upgrades. Modular design allows changes without affecting existing systems.
Battery Installation and Power Management
Proper battery installation and power management form the foundation of any successful kayak fish finder setup. Poor electrical systems cause more installation failures than all other factors combined, making this one of the most critical aspects of your installation project.
| Mounting Method | Best For | Difficulty | Cost | Pros | Cons |
|---|---|---|---|---|---|
| Scupper Mount | Sit-on-top kayaks | Easy | $30-50 | No drilling, removable, quick install | Limited positioning, may interfere with paddling |
| Through-Hull | Serious anglers, permanent setup | Hard | $50-100 | Best performance, clean look, optimal positioning | Permanent modification, voids warranty, requires tools |
| Gear Track | Multiple kayaks, flexibility | Medium | $40-80 | Removable, adjustable, professional look | Requires drilling, more expensive |
| Side Arm Mount | Inflatable kayaks, rentals | Easy | $25-40 | No modifications, works on any kayak | Less stable, may obstruct view |
| Suction Cup | Temporary use, testing | Very Easy | $15-30 | Instant setup, completely removable | Unreliable, limited to smooth surfaces |
| Battery Type | Capacity | Weight | Cost | Runtime (7″ Unit) | Lifespan | Best For |
|---|---|---|---|---|---|---|
| 12Ah Lead Acid | 12Ah | 8-10 lbs | $40-60 | 4-5 hours | 2-3 years | Budget-conscious anglers |
| 20Ah Lead Acid | 20Ah | 12-15 lbs | $60-90 | 7-8 hours | 2-3 years | Long fishing trips |
| 12Ah Lithium | 12Ah | 3-4 lbs | $150-200 | 4-5 hours | 8-10 years | Weight-conscious paddlers |
| 20Ah Lithium | 20Ah | 5-6 lbs | $250-350 | 7-8 hours | 8-10 years | Professional anglers |
| Portable Power Bank | 5-10Ah | 1-2 lbs | $30-80 | 2-4 hours | 3-5 years | Casual use, backup power |
Battery Selection: Lead Acid vs. Lithium Analysis
Lead Acid Battery Advantages include proven reliability, lower initial cost, and universal charging compatibility. A quality 12Ah sealed lead acid battery costs $40-60 and provides adequate power for most day-long fishing trips. These batteries handle overcharging better and work with any standard marine charger.
Lead Acid Limitations center around weight (8-10 pounds for 12Ah capacity) and charging requirements. These batteries must be recharged promptly after use to prevent sulfation damage, and they lose capacity quickly in cold weather. Deep discharge cycles significantly reduce battery life.
Lithium Battery Performance offers dramatic improvements in weight (3-4 pounds for equivalent capacity), charging speed, and cycle life. Dakota Lithium and Battle Born batteries provide 2,000+ charge cycles compared to 300-500 for lead acid. They maintain full capacity down to freezing temperatures and handle partial charging without damage.
Lithium Investment Analysis shows higher upfront costs ($150-300) but lower long-term expenses due to extended life and superior performance. For serious anglers who fish frequently, lithium batteries typically pay for themselves within 2-3 years through longer life and better performance.
Capacity Planning requires understanding your fish finder's power consumption and typical fishing duration. Most kayak fish finders draw 1.5-4 amps per hour. A 12Ah battery provides 3-8 hours of operation depending on your unit's power consumption and display brightness settings.
Optimal Placement for Weight Distribution
Weight Distribution Principles affect kayak stability, tracking, and overall performance. Battery placement should maintain proper trim while keeping weight low and centered. Poor battery placement can make your kayak unstable, difficult to paddle, or prone to weathercocking.
Primary Placement Options each offer distinct advantages and challenges:
Behind Seat Placement provides easy access and good weight distribution but may interfere with gear storage or seat adjustment. This location works well for most recreational kayaks and keeps battery weight centered.
In-Hull Storage offers the best weight distribution and protection but complicates access for maintenance and charging. This method works best with permanent installations and integrated charging systems.
Bow Storage can improve tracking in windy conditions but makes access difficult and may affect kayak trim. Consider this option only if other locations aren't available or if you need to balance weight from other equipment.
Accessibility Requirements for battery maintenance, charging, and replacement must be considered during placement planning. You'll need regular access for charging, periodic maintenance, and eventual replacement. Plan accordingly to avoid major disassembly for routine tasks.
Wiring Installation and Protection Systems
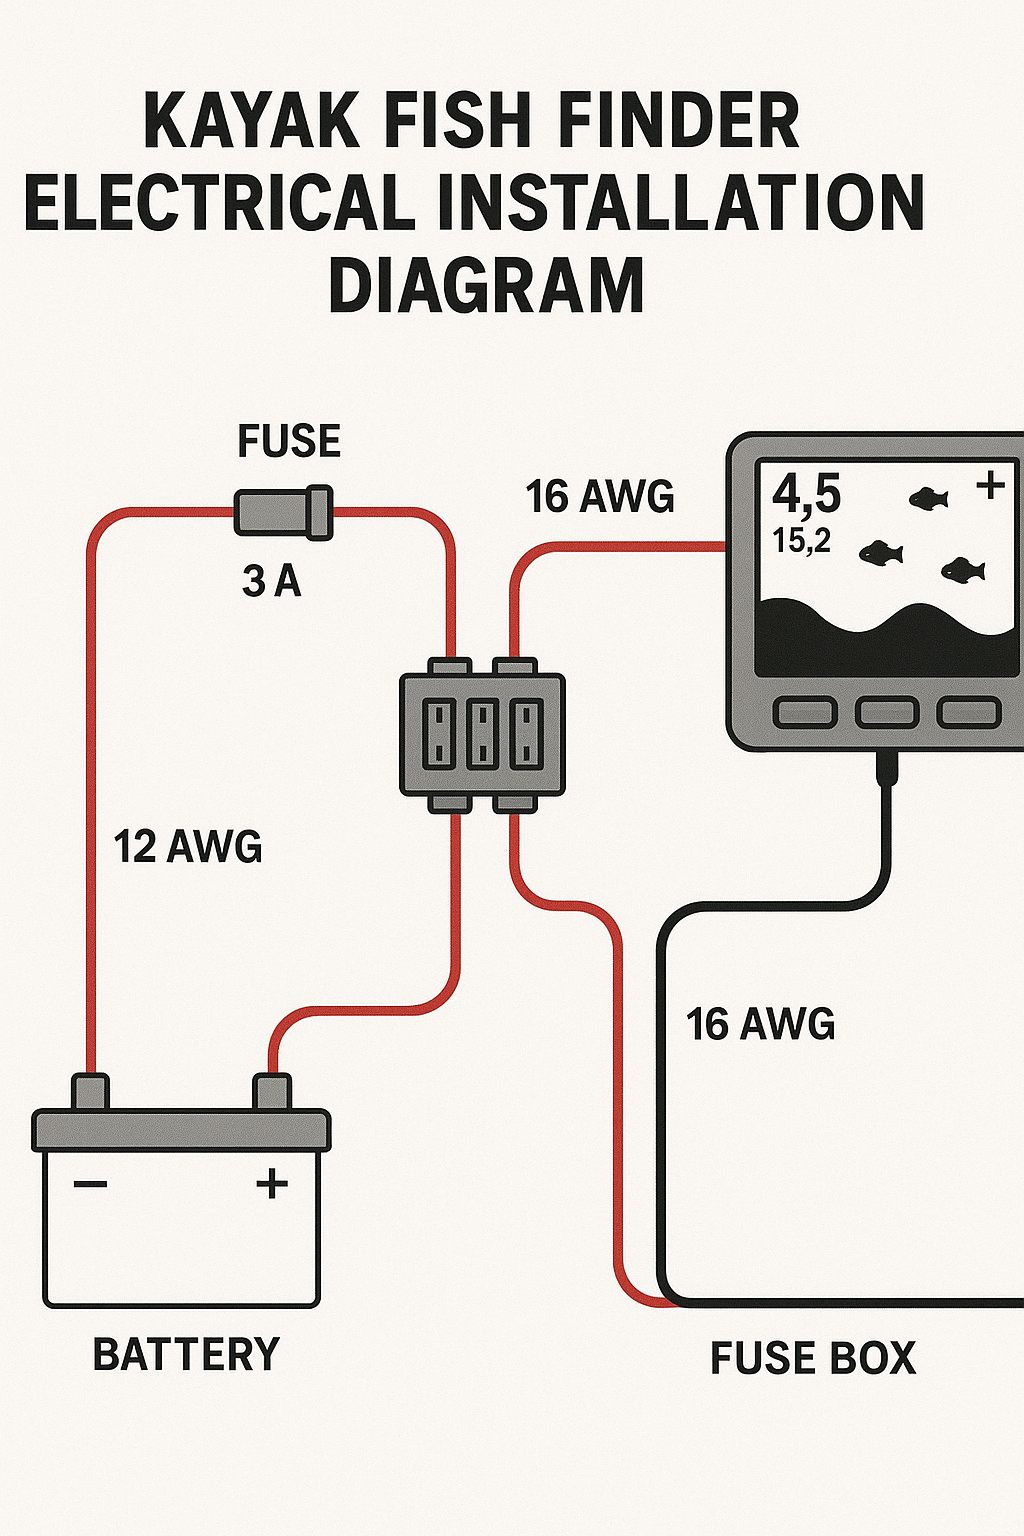
Marine Electrical Standards require specific practices for safety and reliability. Use only marine-grade wire rated for continuous moisture exposure. ABYC standards specify proper fusing, grounding, and installation techniques that prevent fires and electrical hazards.
Wire Sizing must handle your system's current requirements without voltage drop. Most kayak fish finder installations use 14 AWG wire for runs under 10 feet, but longer runs or higher current draws may require 12 AWG. Voltage drop calculations ensure adequate power delivery to your electronics.
Fuse Protection prevents electrical fires and equipment damage from short circuits or overloads. Install fuses within 7 inches of the battery positive terminal and size them 25% above your equipment's maximum current draw. Marine-grade fuse holders provide reliable protection in harsh environments.
Connection Quality determines long-term reliability and performance. Marine-grade terminals resist corrosion and provide secure connections. Heat shrink tubing over connections provides additional protection. Dielectric grease prevents corrosion in critical connections.
Cable Routing must protect wires from damage while allowing normal kayak operation. Avoid sharp edges and moving parts that can damage wire insulation. Secure cables every 12-18 inches to prevent movement and chafing. Service loops allow equipment removal without rewiring.
Charging Systems and Maintenance Protocols
Charging System Selection depends on your battery type and usage patterns. Smart chargers with multi-stage charging optimize battery life and performance. Solar charging systems provide field charging capability for extended trips. Onboard charging systems eliminate the need to remove batteries for charging.
Charging Safety requires proper procedures to prevent damage and hazards. Never charge batteries in enclosed spaces without adequate ventilation. Monitor charging progress and disconnect chargers when complete. Use appropriate chargers designed for your specific battery type.
Maintenance Schedules extend battery life and ensure reliable performance. Monthly voltage checks identify developing problems before they cause failures. Annual capacity testing determines when replacement is needed. Connection cleaning prevents corrosion and voltage drop.
Winterization Procedures protect batteries during storage and freezing weather. Lithium batteries should be stored at 50-60% charge in temperatures above freezing. Lead acid batteries require full charging before storage and periodic maintenance charging. Disconnect all loads during extended storage periods.
Display Mounting and Positioning
Proper display mounting and positioning dramatically affects your fishing success by ensuring clear visibility, easy operation, and protection from damage. Poor display placement is one of the most common installation mistakes that reduces fish finder effectiveness and fishing enjoyment.
Optimal Display Positioning for Visibility and Access
Viewing Distance should allow easy reading without eye strain or focus changes. Most kayak fish finders work best positioned 18-24 inches from your normal seating position. Closer mounting creates neck strain, while farther distances make detail reading difficult in bright conditions.
Angle Optimization prevents glare while ensuring clear visibility from your normal fishing positions. The display should tilt toward your seating position at approximately 15-20 degrees from vertical. Adjustable mounts allow fine-tuning for different lighting conditions and personal preferences.
Height Considerations balance visibility with protection from spray and impact damage. Mount displays high enough to clear gear and paddle movements but low enough to avoid excessive exposure to spray and sun. Eye level positioning reduces neck strain during extended use.
Multiple Position Requirements accommodate different fishing activities and conditions. Consider sight fishing positions, trolling posture, and anchored fishing when planning display placement. Swivel mounts provide adjustment capability for different situations.
Mounting Hardware Selection and Installation
Mount Type Selection depends on your kayak configuration and usage requirements. Track-mounted systems provide adjustability and easy removal. Permanent mounts offer maximum stability and security. Clamp-on systems work well for temporary installations or rental kayaks.
Load Capacity must exceed your display weight with adequate safety margin. Most kayak fish finders weigh 2-4 pounds, but mounting systems should handle at least 10 pounds to account for dynamic loads and vibration. Quality mounts provide specifications for maximum load capacity.
Vibration Resistance ensures clear display operation and extends equipment life. Rigid mounting systems prevent display movement that creates reading difficulties. Shock absorption protects electronics from impact damage during transport or rough water operation.
Installation Hardware must match your kayak material and provide secure attachment. Stainless steel fasteners resist corrosion and provide reliable attachment. Backing plates distribute loads and prevent stress concentration in thin kayak materials.
Screen Protection and Glare Reduction
Physical Protection prevents expensive damage from impact, spray, and UV exposure. Screen protectors prevent scratches and reduce glare. Protective covers shield displays during transport and storage. Shock-resistant cases provide maximum protection for portable units.
Glare Reduction improves visibility in bright conditions and reduces eye strain. Anti-glare screen protectors significantly improve visibility in direct sunlight. Hood systems provide shade while maintaining full screen visibility. Polarized visors reduce reflected glare from water surfaces.
UV Protection prevents screen degradation and extends display life. UV-resistant screen protectors prevent yellowing and clarity loss. Protective covers during storage prevent UV damage. Shaded mounting locations reduce direct sun exposure.
Weather Protection ensures reliable operation in harsh conditions. Waterproof cases protect against spray and rain. Drainage systems prevent water accumulation around electronics. Ventilation prevents condensation in enclosed mounting areas.
Cable Management for Clean Installation
Cable Routing must protect wires while maintaining clean appearance and easy maintenance access. Hidden routing through existing kayak channels provides protection and professional appearance. External routing with proper protection offers easier maintenance access.
Strain Relief prevents cable damage at connection points and reduces stress on delicate connectors. Service loops at connections allow movement without stress. Proper bend radius prevents wire damage inside cable jackets.
Organization Systems keep multiple cables neat and accessible. Cable ties secure bundles at regular intervals. Adhesive guides provide secure routing points. Spiral wrap protects cable bundles while allowing flexibility.
Maintenance Access allows easy troubleshooting and equipment changes without major disassembly. Removable covers provide access to connections. Labeled cables speed troubleshooting. Accessible connection points simplify maintenance and modifications.
Troubleshooting Common Installation Issues
Even carefully planned installations can develop problems over time. Understanding common issues and their solutions helps you maintain peak performance and avoid expensive repairs or equipment replacement. I've encountered virtually every possible installation problem over the years, and most have straightforward solutions when you know what to look for.
Signal Quality Issues and Resolution
Poor Depth Readings often indicate air bubbles under the transducer or improper mounting angle. Through-hull installations can develop air pockets if the adhesive bond fails or if the hull flexes excessively. Remove the transducer, clean all surfaces thoroughly, and reinstall with fresh adhesive, ensuring complete contact across the transducer face.
Intermittent Signal Loss typically results from loose connections or cable damage. Check all electrical connections for corrosion or looseness, paying special attention to power connections and transducer cable terminations. Multimeter testing can identify voltage drops or connection problems that aren't visually obvious.
Interference and Noise on the display usually comes from electrical interference or improper grounding. Engine noise appears as regular patterns on the display and indicates inadequate power filtering. Radio frequency interference creates random noise and may require relocating equipment or adding filters.
Speed-Related Performance Loss affects external transducer mounts at higher speeds due to turbulence and cavitation. Scupper mounts typically maintain good performance up to 4-5 mph, while side-arm mounts may lose effectiveness above 3-4 mph. Consider through-hull installation for high-speed applications.
Electrical Problems and Wiring Troubleshooting
Power Supply Issues cause the most common electrical problems in kayak fish finder installations. Voltage drop from undersized wiring or poor connections reduces performance and may cause equipment damage. Use a multimeter to check voltage at the fish finder terminals under load – readings should be within 10% of battery voltage.
Blown Fuses indicate overcurrent conditions that require investigation before replacement. Check for short circuits in wiring, water intrusion in connections, or equipment failure in the fish finder itself. Never replace fuses with higher ratings – this eliminates protection and creates fire hazards.
Corrosion Problems develop over time in marine environments and can cause various electrical issues. Green corrosion on copper connections indicates water intrusion and requires complete cleaning and resealing. White corrosion on aluminum components suggests galvanic action and improper material selection.
Battery Performance Degradation affects system reliability and operation time. Capacity testing with a proper load tester determines actual battery condition. Voltage testing under load reveals internal resistance problems. Charging system problems can prevent proper battery maintenance and reduce life.
Mounting Stability and Vibration Solutions
Loose Mounting Systems develop over time due to vibration, thermal cycling, and normal wear. Track-mounted systems may require periodic adjustment of clamping mechanisms. Permanent mounts can loosen due to thermal expansion and contraction. Regular inspection and maintenance prevent minor problems from becoming major failures.
Vibration-Induced Problems affect display readability and equipment longevity. Excessive vibration can damage internal components and create display artifacts. Isolation mounts reduce vibration transmission from the kayak to sensitive electronics. Rigid mounting systems prevent display movement that creates reading difficulties.
Stress Concentration at mounting points can crack kayak materials or damage equipment. Backing plates distribute loads over larger areas and prevent stress concentration. Proper fastener torque provides secure attachment without over-stressing materials.
Flexibility Requirements allow normal kayak flexing without damaging equipment or mounts. Service loops in cables prevent stress concentration at connections. Flexible mounting systems accommodate kayak movement without transmitting stress to equipment.
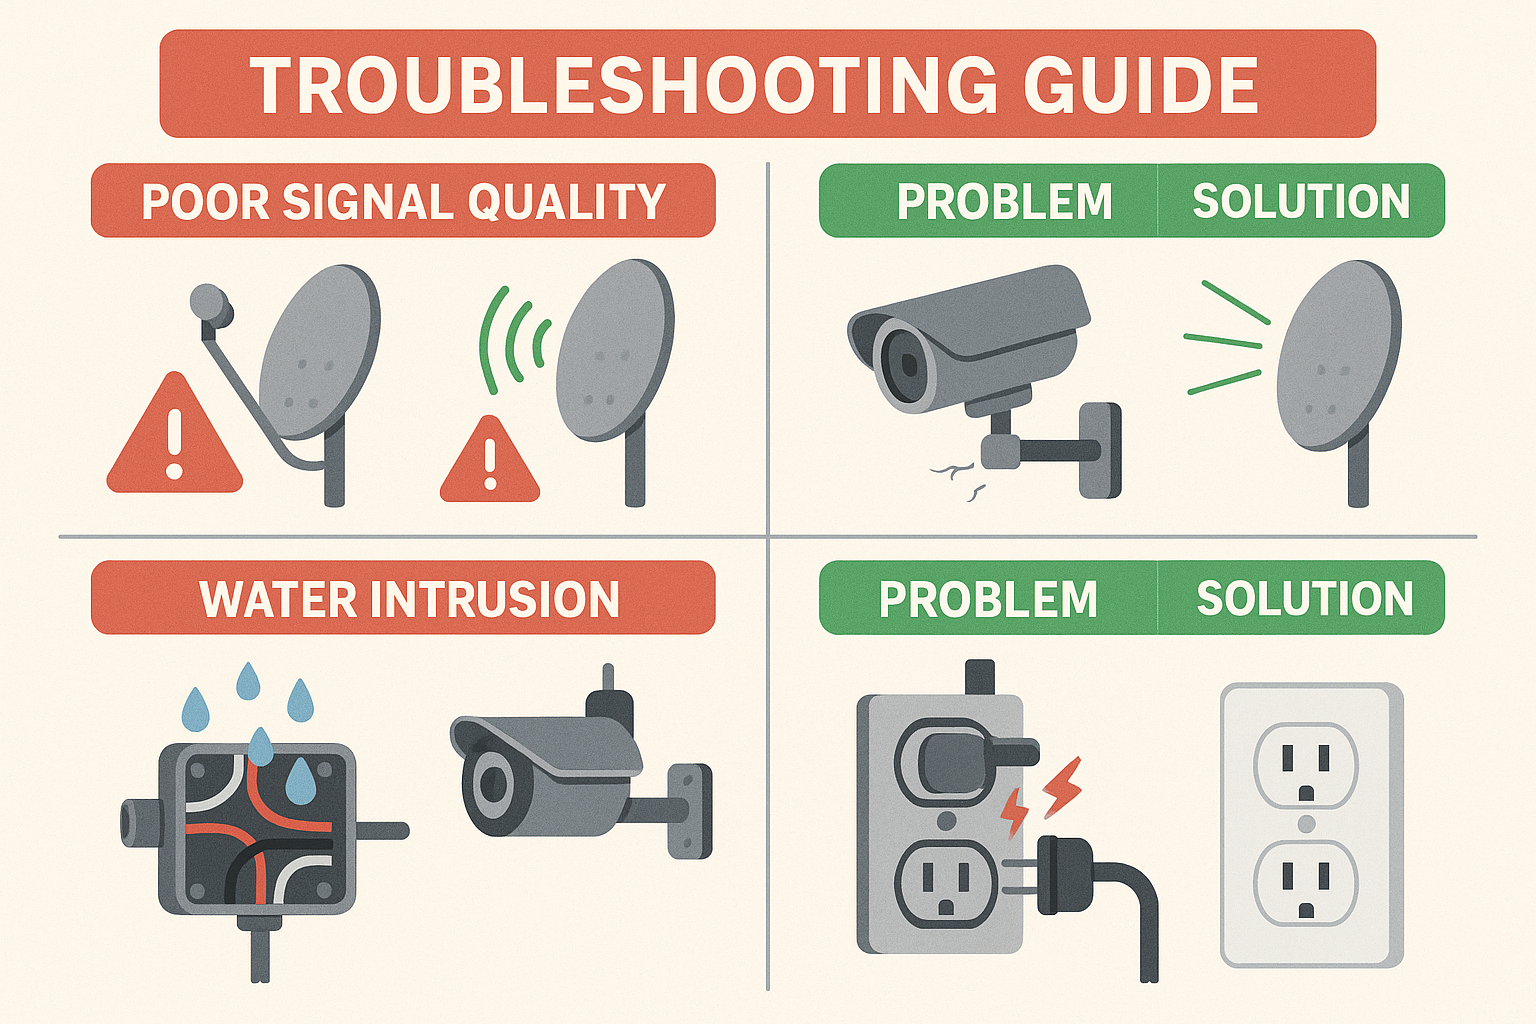
Water Intrusion Prevention and Repair
Seal Failure in scupper mounts or cable connections allows water intrusion that can damage electronics. Regular inspection of seals and gaskets identifies problems before they cause damage. Preventive maintenance with fresh sealant extends seal life and prevents failures.
Cable Entry Points require special attention to prevent water intrusion. Proper sealing with marine-grade compounds prevents water entry while allowing cable movement. Drip loops direct water away from connection points. Waterproof connectors provide reliable protection in harsh environments.
Drainage Systems prevent water accumulation in equipment areas. Adequate drainage allows water to escape rather than accumulating around electronics. Ventilation prevents condensation in enclosed spaces. Proper positioning keeps equipment above potential water accumulation areas.
Emergency Procedures for water intrusion minimize damage and maintain fishing capability. Immediate disconnection of power prevents short circuits and equipment damage. Fresh water rinsing removes salt deposits that cause corrosion. Thorough drying before reconnection prevents additional damage.
Frequently Asked Questions
Sit-Inside Kayaks: Through-hull installations work best but require careful planning for interior access. Consider removable systems if you're concerned about permanent modifications.
Inflatable Kayaks: Only use removable mounting systems like gear tracks or side-arm mounts to avoid puncturing the hull.
Pedal-Drive Kayaks: Plan transducer placement carefully to avoid interference with the drive mechanism.
Lithium Batteries: More expensive ($150-300) but offer superior performance with 3-4 pound weight, faster charging, and 2-3 times longer lifespan.
Power Consumption: Most kayak fish finders draw 1.5-4 amps. Calculate your needs: a 7-inch unit typically uses 2.5 amps per hour.
- Drill with marine-grade bits
- Marine sealant (3M 5200 or similar)
- Wire strippers and crimping tools
- Waterproof connectors
- Measuring tape and pencil
- Sandpaper (220 grit)
- Safety glasses and gloves
- Within easy reach while paddling
- Angled to reduce glare from sun
- Protected from paddle strikes
- Clear line of sight without neck strain
- Secure mounting to prevent damage from waves
Removable Systems: Maximum flexibility to move equipment between kayaks, secure expensive electronics when not fishing, and avoid permanent modifications.
Gear track installations offer the best of both worlds - secure mounting during use with easy removal for storage and transport.
- Use marine-grade fuses and circuit breakers
- Install waterproof battery compartments
- Route cables away from sharp edges
- Use proper gauge wire for your fish finder's amperage
- Include an easy-access power switch
- Test all connections before final installation
Conclusion
Installing a fish finder on your kayak transforms your fishing experience from guesswork to precision, but success depends entirely on choosing the right method for your specific situation and executing it properly. Throughout this comprehensive guide, we've explored five distinct installation approaches, each with unique advantages that serve different kayak types, fishing styles, and skill levels.
The key to installation success lies in honest assessment of your needs and capabilities. Beginners with sit-on-top kayaks will find scupper hole mounts provide excellent performance with minimal risk, while experienced DIYers seeking maximum sonar performance should consider through-hull installations. Anglers who fish from multiple kayaks or need equipment security will benefit from removable gear track systems, despite their higher complexity and cost.
Safety and warranty protection must never be compromised for convenience or cost savings. Always verify manufacturer warranty terms before making permanent modifications, use marine-grade components throughout your electrical system, and follow ABYC standards for all wiring installations. The extra investment in quality materials and proper techniques pays dividends in reliability, performance, and safety over years of fishing adventures.
Power management and display positioning separate successful installations from frustrating ones. Proper battery selection, placement, and charging systems ensure reliable operation during long fishing days, while optimal display mounting provides clear visibility and easy operation when it matters most. These seemingly minor details dramatically affect your overall fishing success and enjoyment.
Remember that even the best installation requires periodic maintenance and occasional troubleshooting. Regular inspection of connections, seals, and mounting hardware prevents minor issues from becoming expensive problems. Keep this guide handy for reference, and don't hesitate to seek help from experienced installers or kayak fishing communities when you encounter challenges.
Your investment in a properly installed fish finder system will pay dividends for years to come, whether you're exploring Arkansas waters or tackling challenging offshore fishing adventures. Take your time, follow the methods outlined here, and soon you'll be marking fish with confidence from your perfectly equipped fishing kayak.
Ready to get started? Choose your installation method using the interactive selector above, gather your tools and materials, and transform your kayak into the fish-finding machine you've always wanted. The fish are waiting – now you'll know exactly where to find them.